Philips Hue Motion Sensor with Fibaro
6 January 2022 - Reading time: 5 minutes
It wasn't the only Christmas gift I received from my dad,
the Philips Hue also had a motion Sensor and I actually wanted to use this one in Fibaro also...
but how.... well I came up with the following:
So there isn't actually much you can do with a motion sensor, besides detecting motion,
but I thought it would still be nice to able too see this in Fibaro,
So here the manual how to do so:
Table of Contents
Requirements:
- Fibaro Homecenter 2 (I wasn't able to test this on Fibaro HC 3)
- Philips Hue Hub
- Philips Motion Sensor(s) ( SML003 )
- little bit of JSON knowledge
- little bit of LUA knowledge
Philips Hue Requirements
I have created a separate manual for the Philips Hue Requirements under the Philips Hue Basic Knowledge section,
because I noticed with creating manuals I was re-creating this part every time.
so the requirements to continue with this manual are:
- Knowing your Philips Hue IP Address
- knowing your Hue Username
- Identifying your sensor ID
Fibaro Requirements
I have created a separate manual for the Requirements under the fibaro Home Center basic knowledge section,
the requirements to continue with this manual are:
- Knowing your Fibaro IP Address
- Creating a Virtual Device in Fibaro
Creating a Virtual Device in Fibaro (motion sensor)
Create a Virtual Device in Fibaro with add 4 labels in the "Label" set
name them:
| 1 | |
| Label | presence |
| ID | presence |
| 2 | |
| Label | reachable |
| ID | reachable |
| 3 | |
| Label | battery |
| ID | battery |
| 4 | |
| Label | lastupdated |
| ID | lastupdated |
in the main loop enter the following code
but change the following values:
| ip | the IP Address of your Philips Hue |
| sensorID | the ID of the Sensor you want to control |
| username | your username in order to control your Hue Hub |
local devId        = tonumber(fibaro:getSelfId());
local ip           = '192.168.0.102'
local sensorID     = '3'
local username     = 'rAUnDqU2H4PNwL-bbODk8FAS0SNRT0cEHWF4lwjQ'
local url          = '/api/'..username..'/sensors/'..sensorID..'/'
local http         = Net.FHttp(ip, 80)

response ,status, errorCode = http:GET(url)
local jsonString   = json.decode(response);

fibaro:call(devId, "setProperty", "ui.lastupdated.value", jsonString["state"]["lastupdated"]);
fibaro:call(devId, "setProperty", "ui.presence.value"   , jsonString["state"]["presence"]);
fibaro:call(devId, "setProperty", "ui.Battery.value"    , jsonString["config"]["battery"].."%");
fibaro:call(devId, "setProperty", "ui.reachable.value"  , jsonString["config"]["reachable"]);
if its correct after saving your Virtual Device you should already see the Sensor
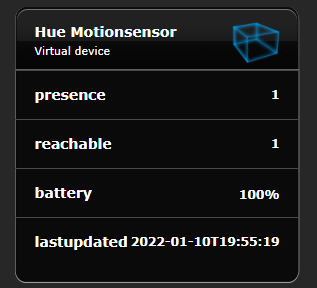
if the value of presence is changed from 0 to 1, it means there is motion detected.
reachable means if the Philips Hue hub can contact the motion sensor 0 means out of range.
Creating a Virtual Device in Fibaro (light sensor)
Create a Virtual Device in Fibaro with add 6 labels in the "Label" set
and name them:
| 1 | |
| Label | lightlevel |
| ID | lightlevel |
| 2 | |
| Label | dark |
| ID | dark |
| 3 | |
| Label | daylight |
| ID | daylight |
| 4 | |
| Label | lastupdated |
| ID | lastupdated |
| 5 | |
| Label | battery |
| ID | battery |
| 6 | |
| Label | reachable |
| ID | reachable |
in the main loop enter the following code
but change the following values:
in my case the light sensor was the motion sensorID + 1
| ip | the IP Address of your Philips Hue |
| sensorID | the ID of the Sensor you want to control |
| username | your username in order to control your Hue Hub |
local devId        = tonumber(fibaro:getSelfId());
local ip           = '192.168.0.102'
local sensorID     = '4'
local username     = 'rAUnDqU2H4PNwL-bbODk8FAS0SNRT0cEHWF4lwjQ'
local url          = '/api/'..username..'/sensors/'..sensorID..'/'
local http         = Net.FHttp(ip, 80)

response ,status, errorCode = http:GET(url)
local jsonString   = json.decode(response);

fibaro:call(devId, "setProperty", "ui.lightlevel.value"   , math.floor(jsonString["state"]["lightlevel"]*0.002301655) .. " %");
fibaro:call(devId, "setProperty", "ui.dark.value"         , jsonString["state"]["dark"]);
fibaro:call(devId, "setProperty", "ui.daylight.value"     , jsonString["state"]["daylight"]);
fibaro:call(devId, "setProperty", "ui.lastupdated.value"  , jsonString["state"]["lastupdated"]);
fibaro:call(devId, "setProperty", "ui.battery.value"      , jsonString["config"]["battery"].."%");
fibaro:call(devId, "setProperty", "ui.reachable.value"    , jsonString["config"]["reachable"]);
if its correct after saving your Virtual Device you should already see the Sensor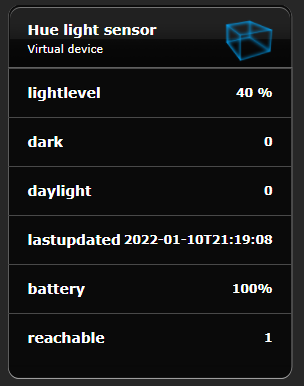
I have tested the max value of lightlevel was 43447,
at least that was my brightest light (850 Lumen) I had (GoBe 850 Wide Dive light)
so I added a calculation in order to get the percentage of light
if you would like to use the value for triggers, I would advise to add another label or remove the % from the label
Creating a Virtual Device in Fibaro (Temperatue sensor)
Create a Virtual Device in Fibaro with add 4 labels in the "Label" set
and name them:
| 1 | |
| Label | temperature |
| ID | temperature |
| 2 | |
| Label | reachable |
| ID | reachable |
| 3 | |
| Label | battery |
| ID | battery |
| 4 | |
| Label | lastupdated |
| ID | lastupdated |
in the main loop enter the following code
but change the following values:
in my case the light sensor was the motion sensorID + 2
local devId        = tonumber(fibaro:getSelfId());
local ip           = '192.168.0.102'
local sensorID     = '5'
local username     = 'rAUnDqU2H4PNwL-bbODk8FAS0SNRT0cEHWF4lwjQ'
local url          = '/api/'..username..'/sensors/'..sensorID..'/'
local http         = Net.FHttp(ip, 80)

response ,status, errorCode = http:GET(url)
local jsonString   = json.decode(response);


fibaro:call(devId, "setProperty", "ui.temperature.value" , (jsonString["state"]["temperature"]/100 .. " °C"));
fibaro:call(devId, "setProperty", "ui.lastupdated.value" , jsonString["state"]["lastupdated"]);
fibaro:call(devId, "setProperty", "ui.battery.value"     , jsonString["config"]["battery"].."%");
fibaro:call(devId, "setProperty", "ui.reachable.value"   , jsonString["config"]["reachable"]);
if its correct after saving your Virtual Device you should already see the Sensor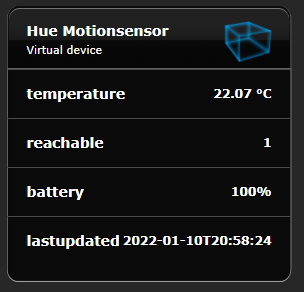
the temperature is stored as 2207, so I have divided the value by 100
if you would like to use the value for triggers, I would advise to add another label or remove the " °C " from the label