Smart Remote Hue Dimmer Switch with Fibaro
14 January 2022 - Reading time: 9 minutes
Another gift I got was the Philips Smart Remote Hue Dimmer Switch (473371), but my challenge was to get this device working with my Fibaro.
So this was actually quite a struggle for me, but it was fun to to do, and I managed to get it working
at first I thought of creating a virtual device in Fibaro, but that made the script quite complicated.
so I wanted to come with in "easier" solution.
So I came up with the following solution
Table of Contents
Requirements
- Fibaro Homecenter 2 (I wasn't able to test this on Fibaro HC 3)
- Philips Hue HUB
- little bit of LUA knowledge
- Knowing your Fibaro IP Address
- Identify your Fibaro Device
- Identify your Virtual Device
- Creating Scenes in Fibaro
- Identifying your Sensor in Philips Hue HUB
Creating a Scene in Fibaro (Remote)
create a scene in Fibaro, you can name it remote-automation
and paste the following code
and replace the following values:
| ip | the IP Address of your Philips Hue |
| username | your username in order to control your Hue Hub |
| sensorID | the ID of the Sensor you want to control |
--[[
%% autostart
%% properties
%% events
%% globals
--]]

local sourceTrigger  = fibaro:getSourceTrigger();
local http           = net.HTTPClient()
local ip             = "192.168.0.102";
local username       = "rAUnDqU2H4PNwL-bbODk8FAS0SNRT0cEHWF4lwjQ";
local idx            = 2;

function datediff(d1, d2)
  -- a = letter, d = number
  -- get the patern of the Date Difference
  -- format is SQL based so: year,month,day,hour,minute,second
  P1="(%d+)-(%d+)-(%d+) (%d+):(%d+):(%d+)";
  P2="(%d+)-(%d+)-(%d+)T(%d+):(%d+):(%d+)";

  -- lets make both dates match the requested date
  yearP1,monthP1,dayP1,hourP1,minP1,secP1=d1:match(P1);
  yearP2,monthP2,dayP2,hourP2,minP2,secP2=d2:match(P2);

  -- now convert them into seconds.
  Date1 = os.time{year=yearP1,month=monthP1,day=dayP1,hour=hourP1,min=minP1,sec=secP1};
  Date2 = os.time{year=yearP2,month=monthP2,day=dayP2,hour=hourP2,min=minP2,sec=secP2};

  -- and substract the difference
  difference=tonumber(Date1)-tonumber(Date2);

  --fibaro:debug(d1)
  --fibaro:debug(d2)
  --fibaro:debug(Date1)
  --fibaro:debug(Date2)
  --fibaro:debug(difference);
  --fibaro:debug(os.date("!%c"));
  return difference
end

-- Function to read out the label value of the Virtual Device
-- usage: NamesID(214,"temperature");
--   214          - ID of Virtual Device
--   temperature  - name of the Label ID
-- returns the value of the label, for example "24.86 ºC"
function NamesID(devID,labelID)
  jsonDeviceID = api.get("/virtualDevices/"..devID)
  return jsonDeviceID["properties"]["ui." .. labelID ..".value"];
end

-- to control the sliders in Fibaro
-- usage: DeviceSlider(132, "increse",10);
--   132             - ID of the Fibaro Device.
--   increse/decrese - used for this function to add or substract
--   10              - amount to add or substract from the current value.
function DeviceSlider(id,action,steps)
  -- lets get the current value first
  local CurrentValue = tonumber(fibaro:getValue(id, "value"))
  -- for increse add amount of steps from CurrentValue
  if action == "increse" then
    fibaro:call(id, "setValue",(CurrentValue + steps))
  end
  -- for decrese remove amount of steps from CurrentValue
  if action == "decrese" then
    fibaro:call(id, "setValue",(CurrentValue - steps))
  end
end

-- Function to find the label of the Virtual Device
-- so we are not depending on the order of the buttons set.
-- usage: VIDNamesID(190)["buttonOn"]);
--   190       - ID of Virtual Device
--   buttonOn  - name of the Label ID
-- returns the index number of the button set, for example: "3"
function VIDNamesID(VID)
  local returnedID ={}
  jsonDeviceID = api.get("/virtualDevices/"..VID)
  for k,v in pairs(jsonDeviceID.properties.rows) do
    for k,v in pairs(v.elements) do
      returnedID[v.name]=v.id
    end
  end
  return returnedID
end

-- this function is depending on the VIDNamesID function
-- for finding the Label ID
-- and is used for Using the sliders in Virtual Devices.
-- usage: VDeviceSlider(190,"Slider1","increse",5);
--   190             - ID of the Virtual Device
--   Slider1         - Name of the Label ID
--   increse/decrese - used for this function to add or substract
--   5               - amount to add or substract from the current value.
function VDeviceSlider(vid,VsliderID,action,steps)
  -- lets get the current value first
  CurrentValue = fibaro:getValue(vid, "ui.".. VsliderID ..".value")
  fibaro:debug(CurrentValue);
  -- lets lookup the deviceID that matches the ID
  VirtualDeviceID = VIDNamesID(vid)[VsliderID];
    -- for increse add amount of steps from CurrentValue
  if action == "increse" then
    fibaro:call(vid, "setSlider",VirtualDeviceID, (CurrentValue + steps))
  end
  -- for decrese remove amount of steps from CurrentValue
  if action == "decrese" then
    fibaro:call(vid, "setSlider",VirtualDeviceID, (CurrentValue - steps))
  end
  --return VirtualDeviceID
end

-- lets create a loop, since there is nothing to trigger
function loopFunc()
  -- lets get a normal date format from the system
  -- ! = UTC
  local SQLDate = os.date("!%Y-%m-%d %H:%M:%S");
  http:request("http://".. ip .. "/api/".. username .."/sensors/"..idx, {
    options = {
      method = 'GET',
    },
    success = function(response)
      -- fibaro:debug("OK");
      if response.status == 200 then
        -- fibaro:debug("OK - 200");
        jsonString = json.decode(response.data);
        -- fibaro:debug(datediff(SQLDate,jsonString["state"]["lastupdated"]));
		-- fibaro:debug(SQLDate);
        -- fibaro:debug(jsonString["state"]["lastupdated"]);
		if datediff(SQLDate,jsonString["state"]["lastupdated"]) <= 3 then
          -- 1000 Button 1 hold
          if tonumber(jsonString["state"]["buttonevent"]) == 1000 then
            fibaro:debug(jsonString["state"]["buttonevent"]);
			-- your actions goes here....
          end
          -- 1001 Button 1 repeat
          if tonumber(jsonString["state"]["buttonevent"]) == 1001 then
            fibaro:debug(jsonString["state"]["buttonevent"]);
			-- your actions goes here....
          end
          -- 1002 Button 1 short
          if tonumber(jsonString["state"]["buttonevent"]) == 1002 then
            fibaro:debug(jsonString["state"]["buttonevent"]);
			-- your actions goes here....
          end
          -- 1003 Button 1 long
          if tonumber(jsonString["state"]["buttonevent"]) == 1003 then
            fibaro:debug(jsonString["state"]["buttonevent"]);
			-- your actions goes here....
          end
          -- 2000 Button 2 hold
          if tonumber(jsonString["state"]["buttonevent"]) == 2000 then
            fibaro:debug(jsonString["state"]["buttonevent"]);
			-- your actions goes here....
          end
          -- 2001 Button 2 repeat
          if tonumber(jsonString["state"]["buttonevent"]) == 2001 then
            fibaro:debug(jsonString["state"]["buttonevent"]);
			-- your actions goes here....
          end
          -- 2002 Button 2 short
          if tonumber(jsonString["state"]["buttonevent"]) == 2002 then
            fibaro:debug(jsonString["state"]["buttonevent"]);
			-- your actions goes here....
          end
          -- 2003 Button 2 long
          if tonumber(jsonString["state"]["buttonevent"]) == 2003 then
            fibaro:debug(jsonString["state"]["buttonevent"]);
			-- your actions goes here....
          end
          -- 3000 Button 3 hold
          if tonumber(jsonString["state"]["buttonevent"]) == 3000 then
            fibaro:debug(jsonString["state"]["buttonevent"]);
			-- your actions goes here....
          end
          -- 3001 Button 3 repeat
          if tonumber(jsonString["state"]["buttonevent"]) == 3001 then
            fibaro:debug(jsonString["state"]["buttonevent"]);
			-- your actions goes here....
          end
          -- 3002 Button 3 short
          if tonumber(jsonString["state"]["buttonevent"]) == 3002 then
            fibaro:debug(jsonString["state"]["buttonevent"]);
			-- your actions goes here....
          end
          -- 3003 Button 3 long
          if tonumber(jsonString["state"]["buttonevent"]) == 3003 then
            fibaro:debug(jsonString["state"]["buttonevent"]);
			-- your actions goes here....
          end
          -- 4000 Button 4 hold
          if tonumber(jsonString["state"]["buttonevent"]) == 4000 then
            fibaro:debug(jsonString["state"]["buttonevent"]);
			-- your actions goes here....
          end
          -- 4001 Button 4 repeat
          if tonumber(jsonString["state"]["buttonevent"]) == 4001 then
            fibaro:debug(jsonString["state"]["buttonevent"]);
			-- your actions goes here....
          end
           -- 4002 Button 4 short
          if tonumber(jsonString["state"]["buttonevent"]) == 4002 then
           fibaro:debug(jsonString["state"]["buttonevent"]);
			-- your actions goes here....
          end
           -- 4003 Button 4 long
          if tonumber(jsonString["state"]["buttonevent"]) == 4003 then
            fibaro:debug(jsonString["state"]["buttonevent"]);
			-- your actions goes here....
          end
		end
      end
    end,
    error = function(err)
      fibaro:debug("Error: " ..err)
    end
  }
  )
  setTimeout(loopFunc,1000)
end

if (sourceTrigger["type"] == "autostart") then
  loopFunc()
end
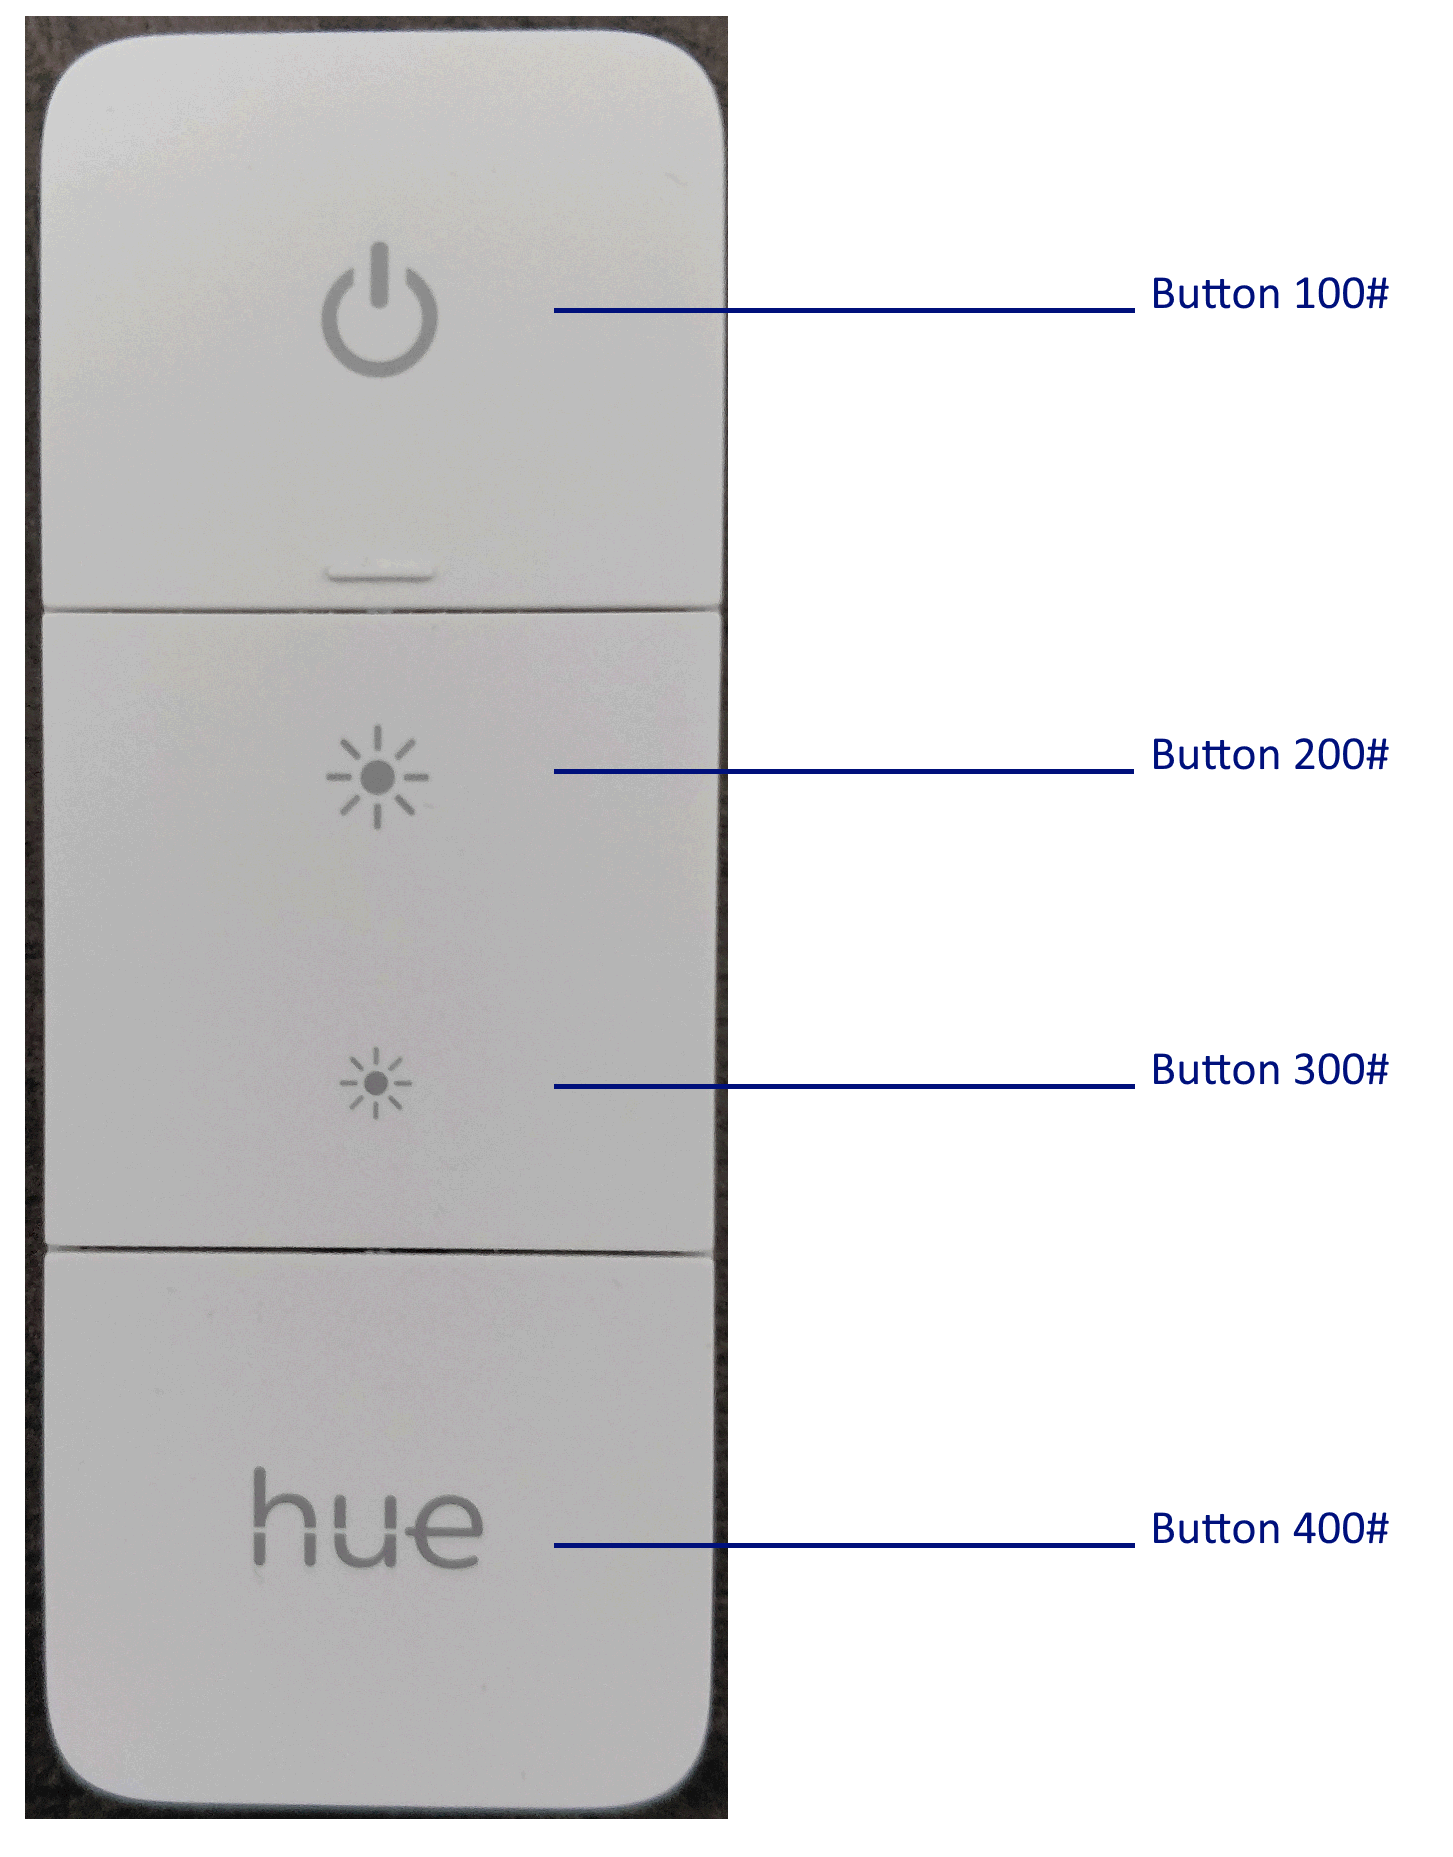
Button Actions
So it looks like a lot of code,
but what it does it triggers this Scene every second to check if an button is pressed,
the buttons use the following IDs
|
 |
Once a button is pressed the last action will be active in the Philips Hue Hub
but to prevent that the button will constantly sent the event to your device, I decided the use the lastupdated value against the current time.
if the lastupdated is larger than 3 seconds the buttons will be ignored.
if datediff(SQLDate,jsonString["state"]["lastupdated"]) <= 3 then
so to put actions on your buttons (didn't implement this in the above code)
you can replace the following part of code in order to have your buttons do something:
turn on/off a Fibaro Light
in this example I will turn on light (with ID 54) to the state On for the first button on my Remote
and the state off for the last button on my remote.
you only need to replace the line of "-- your actions goes here...." with the actual code
here is the an example of how to use this.
          -- 1002 Button 1 short
          if tonumber(jsonString["state"]["buttonevent"]) == 1002 then
            fibaro:debug(jsonString["state"]["buttonevent"]);
			-- your actions goes here....
          end
to
          end
          -- 1002 Button 1 short
          if tonumber(jsonString["state"]["buttonevent"]) == 1002 then
            fibaro:debug(jsonString["state"]["buttonevent"]);
		    fibaro:call(54, "turnOn")
          end
and to turn off the light
          -- 4002 Button 1 short
          if tonumber(jsonString["state"]["buttonevent"]) == 4002 then
            fibaro:debug(jsonString["state"]["buttonevent"]);
			-- your actions goes here....
          end
to
          end
          -- 4002 Button 1 short
          if tonumber(jsonString["state"]["buttonevent"]) == 4002 then
            fibaro:debug(jsonString["state"]["buttonevent"]);
		    fibaro:call(54, "turnOff")
          end
Dim/brighten a Fibaro light
this actually uses 2 sets of ID's
because when you hold the button, the remote return code 2000, if you keep holding it, it will be seen as repeat.
so there are 2 buttons-codes needs to be altered
          -- 2000 Button 2 hold
          if tonumber(jsonString["state"]["buttonevent"]) == 2000 then
            fibaro:debug(jsonString["state"]["buttonevent"]) ;
			DeviceSlider(132, "increse",10);
          end
          -- 2001 Button 2 repeat
          if tonumber(jsonString["state"]["buttonevent"]) == 2001 then
            fibaro:debug(jsonString["state"]["buttonevent"]) ;
			DeviceSlider(132, "increse",10);
          end
this calls the function DeviceSlider (already in the main code)
for the device 132, to increse (use decrese for lowering), and the steps, in this case 10
Turn on Philips Hue light (Virtual Device)
in case if you have not configured a Virtual Device with Philips Hue yet,
you can check the following manual
you might want to get the same result for your Virtual Devices
in this example I have used the Philips Hue Garden light to turn on, on key press 2002
My Philips Hue in Fibaro is known as Virtual Device ID 190,
and the button that has been created there to turn On has the label ID: buttonOn
in order to do so, I used the following code:
          -- 2002 Button 2 short
          if tonumber(jsonString["state"]["buttonevent"]) == 2002 then
            fibaro:debug(jsonString["state"]["buttonevent"]) ;
			fibaro:call(190, "pressButton", VIDNamesID(190)["buttonOn"]);
          end
Dim/brighten a Philips Hue light (Virtual Device)
in case if you have not configured a Virtual Device with Philips Hue yet,
you can check the following manual
you might want to Dim your Philips Hue lights also,
so here are the instructions how to Dim a Virtual Device
          -- 2000 Button 2 hold
          if tonumber(jsonString["state"]["buttonevent"]) == 2000 then
            fibaro:debug(jsonString["state"]["buttonevent"]) ;
			VDeviceSlider(190,"Slider1","increse",5);
          end
          -- 2001 Button 2 repeat
          if tonumber(jsonString["state"]["buttonevent"]) == 2001 then
            fibaro:debug(jsonString["state"]["buttonevent"]) ;
			VDeviceSlider(190,"Slider1","increse",5);
          end
This will call the the VDeviceSlider function (already in the main code)
for the Virtual device 190,
where the slider has ID: "Slider1" and uses the state increse (use decrese for lowering)
and the steps, in this case 5
The reason in this Scene that I only call the Virtual Device buttons/sliders is to keep it sort of simple.
also for troubleshooting, if the button works, the scene should work also.
otherwise we have to build all the actions in the scene itself. and this simplifies it a bit.