Control Philips Hue Light with Fibaro
4 January 2022 - Reading time: 7 minutes
Most of my Domotica systems is based on Fibaro Z-wave,
I liked this system simply because its actually very stable, but for Christmas my dad gave me a Philips Hue Lamp (plus Hub)
so, besides my Fibaro (Z-Wave) and RFXtrx433 system (trough Domoticz) , we have another standard..... and I would like to be able to control all of this in 1 app (the Fibaro App), and this gave me some frustration, but I managed to get it working.
Table of Contents
So after some searching on the web, I found several solutions to control other systems trough Fibaro but with a combination of Virtual Devices and Scenes. and that was way to complicated to create an Virtual Device and a scene for my devices.
it frustrated me that there wasn't a simple example of just turning on a light and turning it off,
I know there might be automated versions, but this manual is basically to understand how it works, so you can make your own version of it.
So if you just want the button you can download the vfib file and import the file in Fibaro and you ware technically done,
otherwise I'll assist you by creating a step-by-step Guide in order to create a Virtual Device that can Control your Philips Hue light.
so I found out the following.
Requirements:
- Fibaro Homecenter 2 (I was unable to test this on Fibaro HC 3)
- Philips Hue Hub
- Philips light(s)
- little bit of JSON knowledge
- little bit of LUA knowledge
Philips Hue Requirements
I have created a separate manual for the Philips Hue Requirements under the Philips Hue Basic Knowledge section,
because I noticed with creating manuals I was re-creating this part every time.
so the requirements to continue with this manual are:
- Knowing your Philips Hue IP Address
- Identifying your Light ID
if you already know this you can just continue reading
Fibaro Requirements
I have created a separate manual for the Requirements under the fibaro Home Center basic knowledge section,
the requirements to continue with this manual are:
- Knowing your Fibaro IP Address
- Creating a Virtual Device in Fibaro
if you already know this you can just continue reading
Creating a Virtual Device (Fibaro)
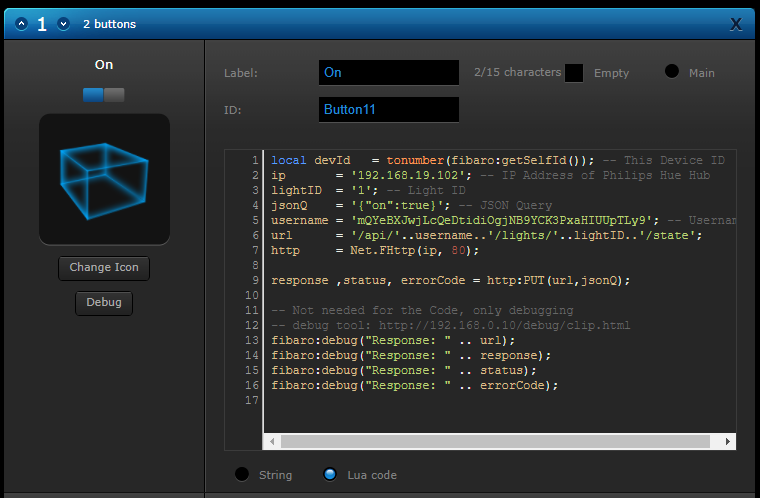
Create a Virtual Device in Fibaro with a set of 2 buttons per line:
Give the first button the Label On
Select Lua Code from the options and paste the following code in the area that says "String to send"
but change the following values:
| ip | the IP address of your Philips Hue |
| LightID | the ID of the lamp you want to control |
| username | the username you just created earlier |
local devId   = tonumber(fibaro:getSelfId()); -- This Device ID
ip       = '192.168.19.102'; -- IP Address of Philips Hue Hub
lightID  = '1'; -- Light ID
jsonQ    = '{"on":true}'; -- JSON Query
username = 'mQYeBXJwjLcQeDtidiOgjNB9YCK3PxaHIUUpTLy9'; -- Username
url      = '/api/'..username..'/lights/'..lightID..'/state';
http     = Net.FHttp(ip, 80);

response ,status, errorCode = http:PUT(url,jsonQ);

-- Not needed for the Code, only debugging
-- debug tool: http://192.168.0.10/debug/clip.html
fibaro:debug("Response: " .. url);
fibaro:debug("Response: " .. response);
fibaro:debug("Response: " .. status);
fibaro:debug("Response: " .. errorCode);
Give the Second Button the label label Off and paste the exact same code, but replace the jsonQ variable from:
jsonQ = '{"on":true}'; -- JSON Queryto
jsonQ = '{"on":false}'; -- JSON Querysave your code by pressing the save button
so now your button is done.
you can turn on and off the light.
if you want to check if your light is actually being triggered by Fibaro
you can check the Philips Hue CLIP API Debugger, (same steps as checking your Philip Hue Light ID)
and you will see that once you press the button for On or Off on your Fibaro you will notice that the on state will change from true to false
(keep in mind for the debug tool you need to press GET again)
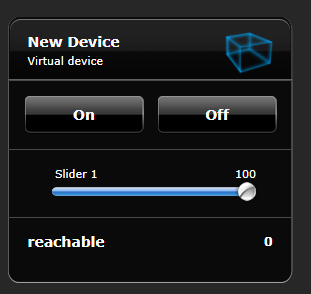
What about dimming the lights?
for dimming the steps are quite simular
you add/edit your device and add the slider as set.
but there are a couple of differences
it might not be the perfect code, but I'll might improve it in the future ;)
| ip | the IP address of your Philips Hue |
| LightID | the ID of the lamp you want to control |
| username | the username you just created earlier |
| slider1 | the ID of the slider you just added (below Label) |
Don't touch the jsonQ, this is just to turn on the light once you move the slider, otherwise Philips Hue will
give an "error" message that the light should be turned on first.
local devId   = tonumber(fibaro:getSelfId());
local slider1 = tonumber(fibaro:getValue(devId, "ui.Slider1.value"));

ip       = '192.168.0.10';
lightID  = '1';
jsonQ    = '{"on":true}';
username = 'mQYeBXJwjLcQeDtidiOgjNB9YCK3PxaHIUUpTLy9';
urlA     = '/api/'..username..'/lights/'..lightID..'/';
urlB     = '/api/'..username..'/lights/'..lightID..'/state';
http     = Net.FHttp(ip, 80);

response ,status, errorCode = http:GET(urlA)

-- Not needed for the Code, only debugging
-- debug tool: http://192.168.0.10/debug/clip.html
--fibaro:debug("Response: " .. urlA);
--fibaro:debug("Response: " .. response);
--fibaro:debug("Response: " .. status);
--fibaro:debug("Response: " .. errorCode);

jsonString = json.decode(response);
fibaro:debug(jsonString["state"]["on"]);


if(jsonString["state"]["on"] == false) then
  response ,status, errorCode = http:PUT(urlB,jsonQ);
  --fibaro:debug("Response:    " .. response);
  --fibaro:debug("status:      " .. status);
  --fibaro:debug("errorCode:   " .. errorCode);
  --fibaro:debug("url:         " .. urlB);
  --fibaro:debug("jsonQ:       " .. jsonQ);
end

-- calculation needed because the slider goes to 100, and Philips Hue to 255 as max
jsonQ    = math.floor(slider1/0.391)..'}';
response ,status, errorCode = http:PUT(urlB,'{"bri":'..jsonQ);

-- Not needed for the Code, only debugging
  fibaro:debug("Response:    " .. response);
  fibaro:debug("status:      " .. status);
  fibaro:debug("errorCode:   " .. errorCode);
  fibaro:debug("url:         " .. urlA);
  fibaro:debug("jsonQ:       " .. jsonQ);
save your code by pressing the save button
so now your button is done.
you can Dim the lights and off the light.
A little feedback?
Since I do not have a lot of Philips Hue devices yet, and the distance between my hub and the light is a bit too long
so I noticed that sometimes the light didn't go on because the light was out of range.
So I also added some labels with information if the Philips Hue Hub can reach the light bulb
in order to get some feedback add a label from the set of buttons
set and paste the following code into the main loop section (since labels cannot have Lua code)
change the following values:
| ip | the IP address of your Philips Hue |
| LightID | the ID of the lamp you want to control |
| username | the username you just created earlier |
local devId   = tonumber(fibaro:getSelfId());
ip       = '192.168.0.10'
lightID  = '1'
username = 'mQYeBXJwjLcQeDtidiOgjNB9YCK3PxaHIUUpTLy9'
url      = '/api/'..username..'/lights/'..lightID..'/'
http     = Net.FHttp(ip, 80)

response ,status, errorCode = http:GET(url)
jsonString = json.decode(response);
fibaro:call(devId, "setProperty", "ui.lblreachable.value", jsonString["state"]["reachable"]);

-- Not needed for the Code, only debugging
-- debug tool: http://192.168.0.10/debug/clip.html
fibaro:debug("reachable");fibaro:debug(jsonString["state"]["reachable"]);
fibaro:debug("on");fibaro:debug(jsonString["state"]["on"]);
and now you will get every second the status of the Sub if it can reach your light.
Here are some more examples you are able to add for some feedback
Add some more labels from the set of buttons
and set the ID to label2,label3,label4 and label5
I know some might be useless but at least you don't need to struggle how the json structure is build up.
fibaro:call(devId, "setProperty", "ui.Label2.value", jsonString["state"]["on"]);
fibaro:call(devId, "setProperty", "ui.Label3.value", jsonString["state"]["bri"]);
fibaro:call(devId, "setProperty", "ui.Label4.value", jsonString["name"]);
fibaro:call(devId, "setProperty", "ui.Label5.value", jsonString["capabilities"]["control"]["maxlumen"]);
Downloadable files
here is the downloadable version of our created buttons
I have placed it into a ZIP format, because I noticed that browsers just open the file, and not download, so you can import them into Fibaro and just change the IP's and username
| FileName | Description | Size |
| Rutger's_Gardenlight.zip | Template we just created in this manual | 2 kb |