Domoticz, RFXtrx433 read out in Fibaro
4 January 2022 - Reading time: 6 minutes
So from the old days when I only had Domoticz running, for my RFXtrx433 devices,
I upgated to Fibaro, but kept some devices (mostly temperature sensors and other meters)
but I still wanted to look up the information in Fibaro.
Table of Contents
although there is no history feature for Fibaro Virtual devices, its still nice to read out some instruments trough Fibaro, and for the history, I have to fall back to Domtoicz.
So in this manual, I have a WindMeter based on the RFXtrx433 protocol already setup in Domoticz
Sorry if you were looking for a manual how to connect your RFXtrx433 device in Domoticz. but I didn't made that one (yet)
WindMeter
lets first collect some information that is needed in order to read out the information in Fibaro.
so at first we would like to know what ID your windmeter has in Domoticz
so login into your domoticz and click the Weater tab.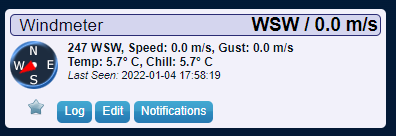
just click the Edit button and you will see the Idx number, in my case Idx: 4
so now that we have your idx number, lets connect to Domoticz json "module"
by going to the following page:http://DomoticzIP/json.htm?type=devices&rid=IDXNumber
( in my case: http://192.168.0.10/json.htm?type=devices&rid=4 )
if its correct you should see something simular as this:
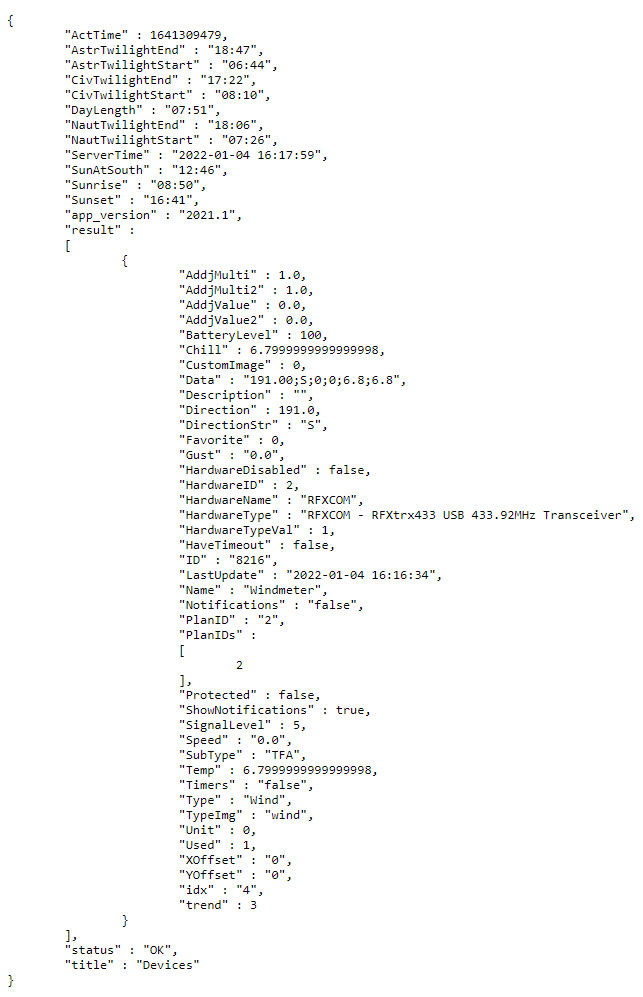
if you search in this json output you will find your idx file ID and some more useful information
just keep this page open, lets create some Virtual devices first in Fibaro.
Fibaro Creating Virtual Devices
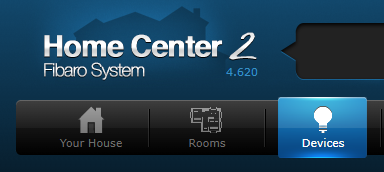
Log into your fibaro Homecenter
you can do this by checking the IP address that your router assigned to your Fibaro, or trough the following website: http://find.fibaro.com/ and login with your fibaro credentials.
once logged in, click Devices in Fibaro
and click the Add or remove device button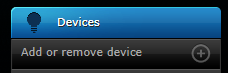
To add the virtual Device press the Add button
your just created new Device, looks empty at first, but if you press the Advanced tab we will get some more options.
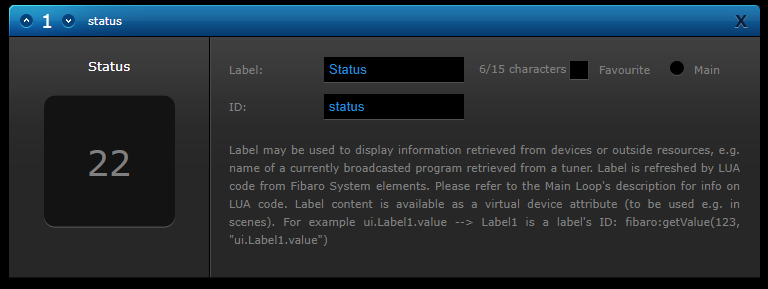
Select Label from the set of buttons and click the Add set button
lets start simple and Label this label, Status and as ID status
now scroll down to the Main loop function and type paste the following code:
but replace the following values:
| IP | enter your domoticz IP address |
| idx | enter your idx number |
local devId   = tonumber(fibaro:getSelfId());
ip       = '192.168.0.20'
idx      = '4'
url      = '/json.htm?type=devices&rid='..idx
http     = Net.FHttp(ip, 80)

response ,status, errorCode = http:GET(url);
-- Not needed for the Code, only debugging
-- domoticz json: url http://192.168.0.20/json.htm?type=devices&rid=4
-- domoticz to see all devices: http://192.168.0.20/json.htm?type=devices&filter=all&used=true&order=Name
fibaro:debug("Response: " .. url);
fibaro:debug("Response: " .. response);
fibaro:debug("Response: " .. status);
fibaro:debug("Response: " .. errorCode);
-- end of Not needed for the Code, only debugging

jsonString = json.decode(response);

fibaro:call(devId, "setProperty", "ui.status.value"      , jsonString["status"]);
so how it works is actually in the last line.
ui.status.value is where "status" is the name of your label, that will be filled with the status from the jsonString
save your code by pressing the save button
so now your button is done.
you might have noticed that the value is already entered with an OK
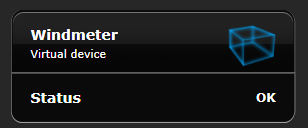
if we go back the the domoticz json page, you will see in the entry the value
"status" : "OK",now for the values that caused me some puzzle work
because Domoticz puts the actual information of the device itself under "result" in a table.
in order to read out this table you need to add another label
for example with the name and ID BatteryLevel
and add the following code in your main loop
fibaro:call(devId, "setProperty", "ui.BatteryLevel.value", jsonString["result"][1]["BatteryLevel"]);and this will show you the battery level of your meter
and this way you are able to add all the labels if you want,
or just download my templates
Rain Meter
for the rain Meter its actually simular as the wind meter, except with different values
the rain meter for example doesn't have temperature (at least mine doesn't)
but has Rain and RainRate values
so here is its the same as the wind,
the code would be as following:
local devId   = tonumber(fibaro:getSelfId());
ip       = '192.168.0.20'
idx      = '3'
url      = '/json.htm?type=devices&rid='..idx
http     = Net.FHttp(ip, 80)

response ,status, errorCode = http:GET(url);
-- Not needed for the Code, only debugging
-- domoticz json: url http://192.168.0.20/json.htm?type=devices&rid=3
-- domoticz to see all devices: http://192.168.0.20/json.htm?type=devices&filter=all&used=true&order=Name
fibaro:debug("Response: " .. url);
fibaro:debug("Response: " .. response);
fibaro:debug("Response: " .. status);
fibaro:debug("Response: " .. errorCode);
-- end of Not needed for the Code, only debugging

jsonString = json.decode(response);

fibaro:call(devId, "setProperty", "ui.Rain.value"              , jsonString["result"][1]["Rain"].. " mm");
fibaro:call(devId, "setProperty", "ui.RainRate.value"          , jsonString["result"][1]["RainRate"].. " mm/h");
and also here I made them downloadable
Temperature Sensors
and I made simular ones for Temperature sensors,
Don't forget the Fibaro Virtual Sensors Labels (DewPoint,Humidity,HumidityStatus)
local devId   = tonumber(fibaro:getSelfId());
ip       = '192.168.0.20'
idx      = '2'
url      = '/json.htm?type=devices&rid='..idx
http     = Net.FHttp(ip, 80)

response ,status, errorCode = http:GET(url);
-- Not needed for the Code, only debugging
-- domoticz json: url http://192.168.0.20/json.htm?type=devices&rid=2
-- domoticz to see all devices: http://192.168.0.20/json.htm?type=devices&filter=all&used=true&order=Name
fibaro:debug("Response: " .. url);
fibaro:debug("Response: " .. response);
fibaro:debug("Response: " .. status);
fibaro:debug("Response: " .. errorCode);
-- end of Not needed for the Code, only debugging

jsonString = json.decode(response);

fibaro:call(devId, "setProperty", "ui.Temp.value"              , jsonString["result"][1]["Temp"].. " ºC");
fibaro:call(devId, "setProperty", "ui.DewPoint.value"          , jsonString["result"][1]["DewPoint"].. " ºC");
fibaro:call(devId, "setProperty", "ui.Humidity.value"          , jsonString["result"][1]["Humidity"].. "%");
fibaro:call(devId, "setProperty", "ui.HumidityStatus.value"    , jsonString["result"][1]["HumidityStatus"]);
Door Sensors
And here the one for the door sensors
local devId   = tonumber(fibaro:getSelfId());
ip       = '192.168.0.20'
idx      = '37'
url      = '/json.htm?type=devices&rid='..idx
http     = Net.FHttp(ip, 80)

response ,status, errorCode = http:GET(url);

jsonString = json.decode(response);


fibaro:debug(jsonString["result"][1]["BatteryLevel"]);
fibaro:debug(jsonString["result"][1]["InternalState"]);
fibaro:debug(jsonString["result"][1]["LastUpdate"]);
fibaro:debug(jsonString["result"][1]["SignalLevel"]);
fibaro:debug(jsonString["result"][1]["Status"]);
fibaro:debug(jsonString["result"][1]["SwitchType"]);


fibaro:call(devId, "setProperty", "ui.BatteryLevel.value"      , jsonString["result"][1]["BatteryLevel"]);
fibaro:call(devId, "setProperty", "ui.InternalState.value"     , jsonString["result"][1]["InternalState"]);
fibaro:call(devId, "setProperty", "ui.LastUpdate.value"        , jsonString["result"][1]["LastUpdate"]);
fibaro:call(devId, "setProperty", "ui.SignalLevel.value"       , jsonString["result"][1]["SignalLevel"]);
fibaro:call(devId, "setProperty", "ui.Status.value"            , jsonString["result"][1]["Status"]);
fibaro:call(devId, "setProperty", "ui.SwitchType.value"        , jsonString["result"][1]["SwitchType"]);
Downloadable files
Here are the download files of the templates for Fibaro,
the zip file contains 2 files, a full template with all the values of the sensor, and a basic one, with just basic information.
| FileName | Description | Size |
| Domoticz_Generic.zip | the generic information (from Domoticz) | 2 kb |
| Rainmeter.zip | Rain Fibaro Templates (Full & basic) | 3 kb |
| Temperature.zip | Temperature Fibaro Templates (Full & basic) | 2 kb |
| Windmeter.zip | Wind Fibaro Templates (Full & basic) | 3 kb |
| Doorsensor.zip | Door Sensor Fibaro Templates (Full & basic) |
4 kb |